Wiper Transmission Repair
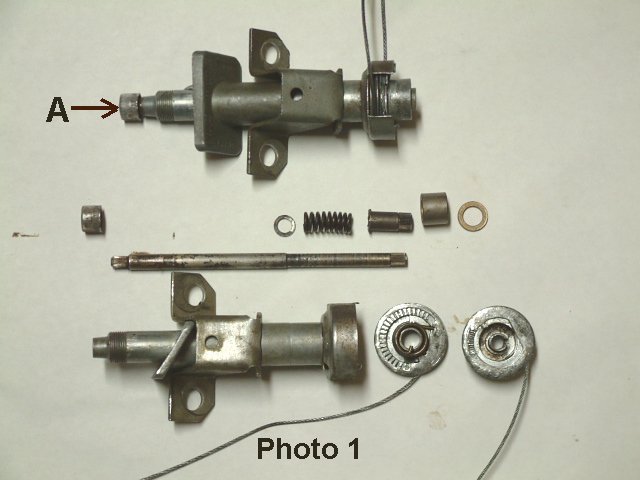
When I purchased this '59 Corvette most of the parts were in boxes. The wiper transmissions were one of the first parts that I decided to look at to see if they were operating properly. When I examined the transmissions, I discovered that both of them needed to be repaired. The wiper shafts would turn freely, but, in order to properly install the operating cables on these transmissions, the two grooved pulleys on the end of the transmissions must be made to "unlock". These pulleys were frozen tight. The picture below shows the right side transmission (assembled) and the left side transmission (disassembled).
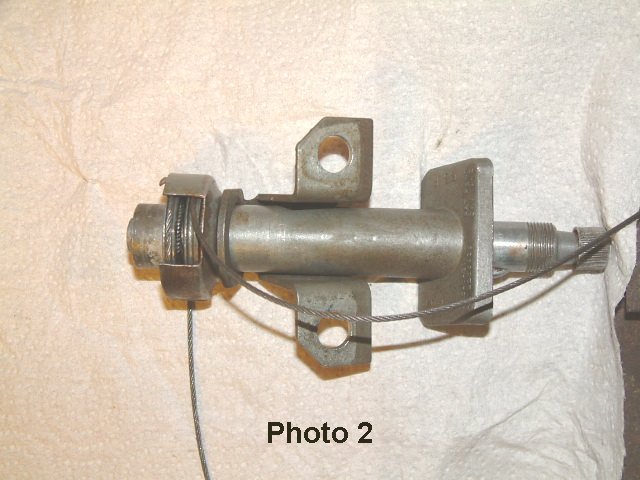
So, how do you tell if the wiper transmission is operating properly? If the transmission is still mounted in the car, remove the wiper blade and arm. If the transmission has been removed from the car, secure the transmission body in a vise. Push (down if the transmission is still mounted in the car) on the top of the shaft where the blade arm was mounted (position "A" in Photo 1). If the transmission is operating properly, the shaft will move about 1/8" to 1/4" and the two pulleys on the bottom of the transmission will separate. In Photo 2 below, the two pulleys are shown separated.
When the two pulleys have separated you should be able to pull on the two cables and the pulleys should unwind to allow you to pull the cables about 3/4" of an inch. Note that you must pull on both cables simultaneously. There is a "recoil" spring mounted between the two spools that "winds up" when you pull on the cables. This is the mechanism that allows you to properly install and tension the cables in the car. When the transmissions are working correctly, and they are installed in the car, have a helper push down on the wiper shaft. At the same time, while working under the dash, grab both cables and pull them with enough force to pull about 3/4" to 1" of an inch of cable off each spool. Your helper should wear leather gloves or push down on the shaft with a block of wood because the shaft is going to be turning when you pull on the cables. While still holding the cables tight, have your helper release the wiper shaft. The pulleys should now be locked and you can route the cable ends around the grooved pulleys that are driven by the wiper motor. Once the cables have been routed correctly, push down on the wiper shaft again to separate the pulleys and tension the cables.
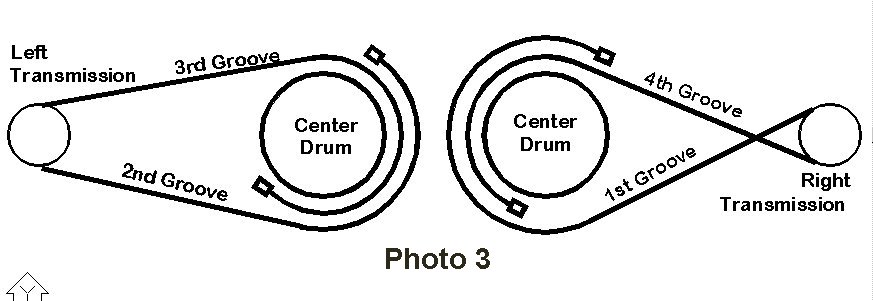
Assuming you got the transmissions to unlock and the cables to release, the next question is "where do the cables go"? The center mounted drum has four grooves The upper cable from the left-hand (driver-side) transmission attaches to the 3rd groove of the auxiliary drive drum (third groove from the firewall), while the lower cable attaches to the 2nd groove. From the right-hand (passenger-side) transmission, the upper cable wraps underneath and attaches to the 1st groove ( groove closest to the firewall), and the lower cable crosses over and attaches to the 4th groove (farthest from the firewall). Note that the drive cables to the right transmission are the only ones that are crossed, the left transmission cables do not cross.
Information from an article on the Restorer CD indicates that the wire cable lengths (when new) from GM should be as follows:
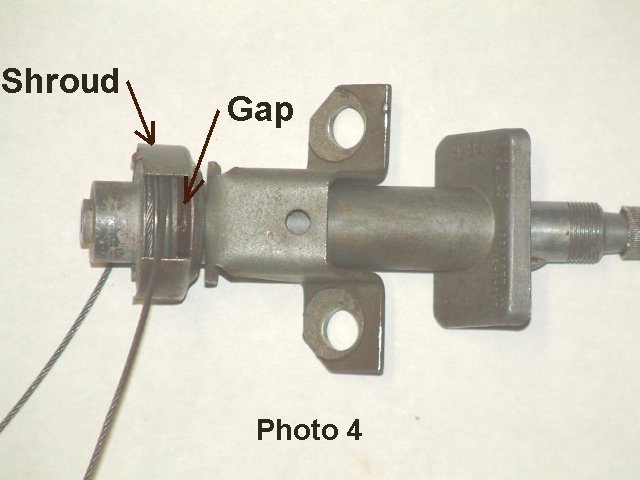
If the transmission will not unlock, the collar (see Photo 5) is probably rusted to the shaft, and, since the upper pulley is attached to the splined end of the collar, the pulley is frozen in place. To loosen the collar, first try soaking the transmission in penetrating oil for a few days. If the penetrating oil does not free the pulley, you will probably have to dis-assemble the transmission. If you push hard enough on the wiper shaft (like in a vise or by hitting it with a hammer), both pulleys will move together until the lower pulley hits the tabs on the bottom of the pulley shroud. In this case you probably have pushed the bearing (see Photo 5) out of the transmission case and you will have to dis-assemble the transmission to repair it. Photo 4 shows a transmission that has the two pulleys "stuck" together. Note the gap between the upper pulley and the pulley shroud.
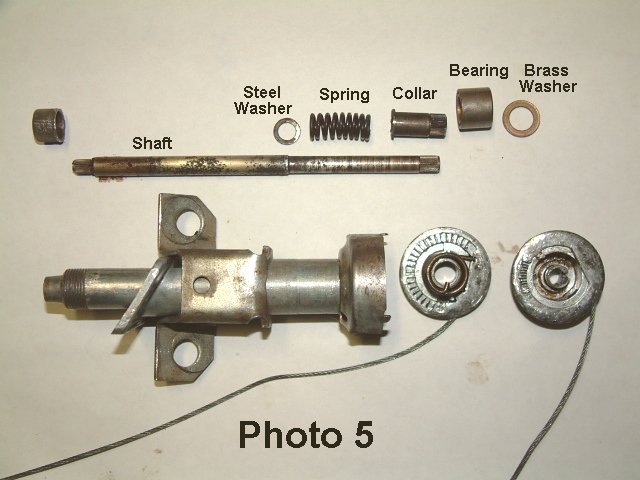
If you decide to repair the transmission, the picture below (Photo 5) shows what it looks like dis-assembled. Keep in mind that this transmission is from a '59 Corvette and there may be small differences from other years. Both ends of the shaft are splined and the end of the shaft will be peened over to secure the splined cap on top (where the wiper arm attaches). The lower pulley may also be peened to secure the bottom pulley. I have seen some transmissions where the pulley end was not peened.
The pulleys will first have to be removed from the shaft. Before you remove the pulleys, make a sketch showing the location and routing of the cables in relation to the shroud so you will know where the cables go when you put the pulleys back on the shaft. If the shaft is peened over, carefully file away the peened part of the shaft. In order to facilitate the removal of this peening, you may be able to place a socket against the collar on the bottom of the pulley and then either tap the socket with a hammer or use an hydraulic press to slightly move the pulley just enough to push the pulley away from the peening.
Once the peening has been removed, secure the transmission body in a vise, and tap the shaft out with a punch.
Notice in Photo 5 that the splined cap (where the wiper arm attaches) has been removed. Normally you should not have to remove this cap, but this particular transmission shaft was so rusty that the spring and collar were frozen to the shaft and no amount of soaking in penetration oil, or tapping with a hammer would free them. Rather than risk damaging the inside of the transmission housing, I removed the cap and withdrew the shaft from the bottom of the transmission
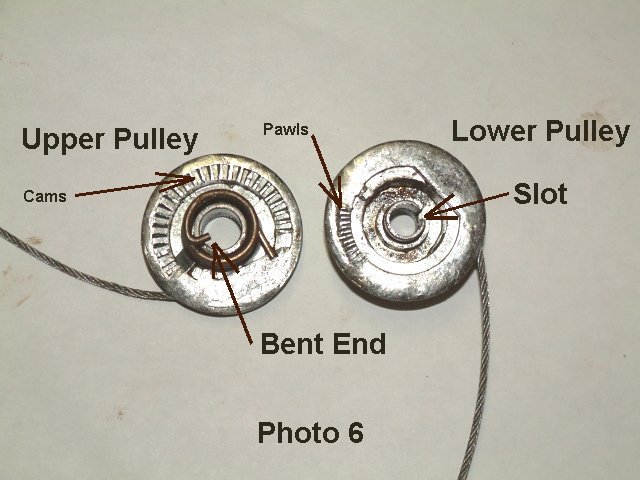
If you get the urge to try and separate the pulleys with the transmission still assembled, like trying to pry them apart using a small screwdriver or a thin chisel, be very careful that you do not damage the pawls and cams (see Photo 6) on the pulleys.
Photo 6 shows the two pulleys (separated) and the recoil spring. Note the bent end on the recoil spring and the slot in the sleeve in the lower pulley. When re-assembling the pulleys, the bent end of the spring should fit in the slot. Also notice the pawl and cams cast into the pulleys. These are what keep the pulleys "locked" together when you release the pressure on the wiper shaft.
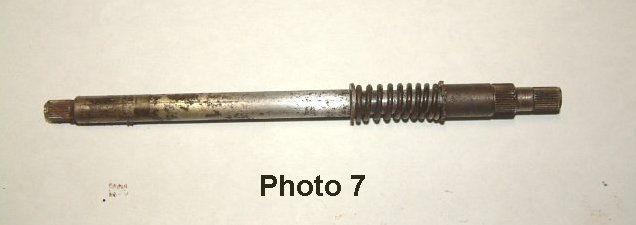
To re-assemble the transmission, first clean the shaft and all the parts that attach to it. Photo 7 shows the assembled wiper shaft. The splined collar must move freely on the shaft. Lubricate the shaft, spring, and collar it with a good waterproof grease.
Probably the reason you have dis-assembled the transmission is because the bearing (see Photo 5) has come loose from the housing. This bearing is a brass (or bronze) bushing surrounded by a steel sleeve and is a press fit in the transmission housing. If the bearing is loose, remove it from the housing and use a sharp punch to prick several holes around the outside of the steel sleeve. Eight or ten prick marks should be sufficient.
Insert the assembled shaft into the transmission housing and place the bearing in position. Use a properly sized socket and tap (or press) the bearing into position. The end of the bearing should be flush with the bottom of the shroud.
I first tried putting the pulleys back onto the shaft by assembling the pulleys and recoil spring and then pressing the entire assembly back onto the shaft (making sure that you have the cables routed correctly in the shroud). This method worked, but I felt that there was the possibility of damaging the cam and pawls on the pulleys using this method. The alternate method was to press the pulleys onto the shaft one at a time, making sure to get the recoil spring in the proper position before pressing on the bottom pulley. I pressed the bottom pulley on far enough so that the end of the shaft protruded just enough to stake it with a punch so as to insure it would not come loose.
Now that the transmission is assembled, clamp the housing in a vise and check for proper operation. If the unlocking mechanism is working properly, fold over the two locking tabs on the bottom of the shroud. The transmission should now be ready to install in the car.